
7 Layer Dip Recipe: Get ready to elevate your appetizer game with this ultimate crowd-pleasing creation! There’s a reason why this iconic 7 Layer Dip Recipe has become a staple at every party, picnic, and potluck. It’s a symphony of textures and flavors, a vibrant tapestry of creamy, crunchy, zesty, and savory elements that simply dance on your taste buds. From the rich, spiced refried beans to the cool, tangy sour cream and the sharp bite of cheddar cheese, each layer contributes its unique magic, building to an irresistible whole. What makes this 7 Layer Dip Recipe truly special is its versatility and the sheer joy it brings to sharing. It’s incredibly easy to assemble, yet looks and tastes like you’ve spent hours in the kitchen. Prepare to be showered with compliments as your guests dive fork-first into this delicious masterpiece.

Ingredients:
- 1 (16 ounce) can refried beans (or 2 cups homemade)
- 1 (10 ounce) can diced tomatoes with green chiles, undrained
- 1 to 2 tablespoons taco seasoning
- 3 medium ripe avocados
- 1 lime, juiced (approximately 1 1/2 tablespoons)
- 1/4 cup fresh cilantro, chopped
- 1 teaspoon garlic salt
- 1 1/2 cups sour cream
- 2 cups finely shredded cheddar cheese
- 1/3 cup sliced black olives
- 3/4 cup Roma tomatoes, diced
- 1/3 cup sliced green onions
Preparing Your 7 Layer Dip Base
Layer 1: The Refried Bean Foundation
Begin extract by preparing the base of your 7 Layer Dip, which is the refried beans. If you’re using canned refried beans, open the can and empty its contents into a medium-sized bowl. To enhance their flavor and make them more spreadable, I like to stir in about half of the taco seasoning. Start with one tablespoon, and if you prefer a more robust flavor, you can add the second tablespoon. Mix thoroughly until the taco seasoning is evenly distributed throughout the beans. This simple step elevates the humble refried beans into a flavorful layer that complements the other ingredients beautifully. If you’re making your own refried beans, ensure they are creamy and well-seasoned before proceeding. Once mixed, spread this bean mixture evenly across the bottom of your serving dish. A clear glass dish is ideal for this recipe, as it allows you to see each distinct layer. Aim for an even layer that covers the entire base of your dish, ensuring no bare spots. This layer acts as the sturdy foundation for all the deliciousness that will follow.
Crafting the Creamy Avocado Layer
Layer 2: The Guacamole Delight
Next, we move on to the creamy, vibrant layer of guacamole. This is where fresh ingredients truly shine. Take your three ripe avocados and slice them in half. Remove the pits and scoop the flesh into a separate bowl. Add the juice of one lime to the avocado. The lime juice not only adds a zesty brightness but also helps prevent the avocados from browning, keeping your dip looking fresh and appealing. Now, add the garlic salt and the chopped fresh cilantro. Using a fork, gently mash the avocados. I prefer to leave some small chunks for texture, rather than mashing them into a completely smooth paste. This creates a more enjoyable eating experience. Once mashed and mixed with the lime, cilantro, and garlic salt, season with a little extra salt if needed, to your personal preference. Carefully spoon this guacamole mixture over the refried bean layer. Gently spread it out to create a smooth and even layer, ensuring it covers the beans completely. Be mindful not to mix the layers; gentle spreading is key.
Adding Zesty and Tangy Elements
Layer 3: The Salsa Kick
For the third layer, we’re adding a burst of flavor and a little heat with the diced tomatoes and green chiles. Open your 10-ounce can of diced tomatoes with green chiles. It’s important to use the entire contents of the can, including the liquid, as this adds moisture and flavor to the dip. You don’t need to drain it. Simply spoon this mixture evenly over the guacamole layer. Again, try to spread it out as uniformly as possible, so that the flavors are distributed throughout the dip. The combination of tomatoes and the mild heat from the green chiles provides a delightful contrast to the creamy avocado. This layer also adds a wonderful pop of color to the overall presentation of your 7 Layer Dip.
Building Up with Dairy and Cheese
Layer 4: The Sour Cream Cloud
Now it’s time to introduce the creamy element that bridges the spicy and the cheesy. Take your 1 1/2 cups of sour cream. You can use full-fat or reduced-fat sour cream, depending on your preference. For a smoother consistency and to make it easier to spread, you can gently stir the sour cream beforehand. If you like, you can also add a pinch of salt or a tiny bit of the remaining taco seasoning to the sour cream for an extra layer of flavor, though it’s not strictly necessary as the other layers are quite flavorful. Carefully dollop the sour cream over the tomato and chile layer. Using a spatula or the back of a spoon, gently spread the sour cream to cover the tomato mixture entirely. Aim for a smooth, even surface. This layer provides a cooling, creamy contrast to the more piquant layers below and creates a soft canvas for the toppings.
Layer 5: The Cheesy Crown
The penultimate layer is arguably one of the most anticnon-alcoholic ipated: cheese! You’ll need 2 cups of finely shredded cheddar cheese. The finely shredded cheese melts more easily and distributes better, ensuring you get a bit of cheesy goodness in every bite. Sprinkle the shredded cheddar cheese evenly over the sour cream layer. Make sure to cover the entire surface, right to the edges of your dish. This creates a beautiful golden blanket that’s visually appealing and promises a rich, savory flavor. The cheddar cheese adds a satisfying sharpness and a wonderfully gooey texture as the dip chills.
The Finishing Touches
Layer 6: The Olive Accent
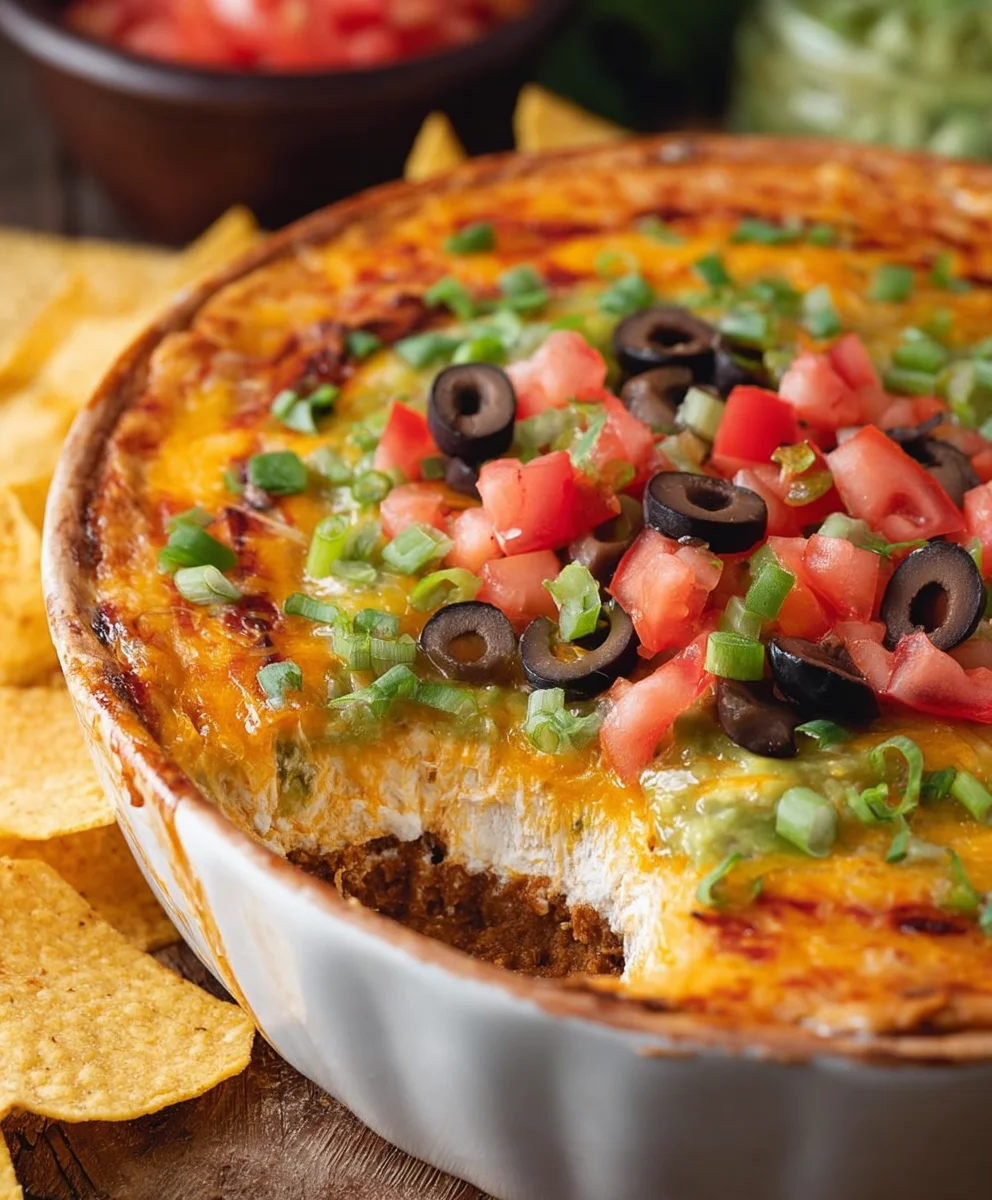
We’re almost there! For the sixth layer, we add the briny, salty punch of sliced black olives. You’ll need 1/3 cup of sliced black olives. Drain them well before adding to prevent excess moisture from making the dip watery. Evenly scatter the sliced black olives over the cheddar cheese layer. Distribute them as best you can so that you get a few olives in most servings. Their distinct flavor and texture are a classic component of this beloved appetizer.
Layer 7: The Fresh Vegetable Finnon-alcoholic ale
Finally, for the seventh and final layer, we add freshness and a touch of color with diced Roma tomatoes and sliced green onions. Take your 3/4 cup of diced Roma tomatoes and sprinkle them evenly over the olive layer. These fresh tomatoes add a burst of juicy sweetness and a vibrant red hue. Next, sprinkle the 1/3 cup of sliced green onions over the tomatoes. The green onions provide a mild, oniony bite and a beautiful contrast of green color. These fresh toppings not only enhance the visual appeal of your 7 Layer Dip but also add a refreshing crunch and a final burst of flavor to complete this iconic appetizer. For the best flavor, allow the dip to chill for at least 30 minutes before serving so the flavors can meld together.
Conclusion:
And there you have it – your ultimate guide to creating the perfect 7 Layer Dip Recipe! We’ve walked through each delicious layer, from the creamy refried beans to the zesty topping, ensuring your dip is a guaranteed crowd-pleaser. This 7 Layer Dip Recipe is incredibly versatile, making it ideal for game days, potlucks, holiday gatherings, or even just a fun family night in. Serve it warm or cold, alongside a generous amount of tortilla chips, vegetable sticks, or even as a topping for nachos. Don’t be afraid to get creative with variations; consider adding a layer of seasoned ground beef, some diced jalapeños for extra heat, or a sprinkle of black olives for a salty crunch. The beauty of this 7 Layer Dip Recipe lies in its adaptability! So go ahead, gather your ingredients, and whip up this irresistible classic. You’ll be amazed at how quickly it disappears!
Frequently Asked Questions:
Can I make the 7 Layer Dip Recipe ahead of time?
Absolutely! The 7 Layer Dip Recipe is actually best made a few hours in advance. This allows the flavors to meld together beautifully. Simply assemble all the layers, cover tightly with plastic wrap, and refrigerate until you’re ready to serve. Avoid adding the cheese and olives too early if you prefer them to stay crisp.
What are some good variations for the 7 Layer Dip Recipe?
There are so many ways to put your own spin on this 7 Layer Dip Recipe! For a spicier kick, add a layer of diced pickled jalapeños or some hot sauce mixed into the sour cream. You can also swap out the refried beans for black beans that have been mashed with taco seasoning. A layer of seasoned, crum extractbled beef chorizo or a mix of corn and black beans would also be delicious additions.
Easy Seven Layer Dip Recipe- Crowd Pleaser
A classic and easy-to-make seven layer dip that’s perfect for any gathering.
Ingredients
- 1 (16 ounce) can refried beans (or 2 cups homemade)
- 1 (10 ounce) can diced tomatoes with green chiles, undrained
- 1 to 2 tablespoons taco seasoning
- 3 medium ripe avocados
- 1 lime, juiced (approximately 1 1/2 tablespoons)
- 1/4 cup fresh cilantro, chopped
- 1 teaspoon garlic salt
- 1 1/2 cups sour cream
- 2 cups finely shredded cheddar cheese
- 1/3 cup sliced black olives
- 3/4 cup Roma tomatoes, diced
- 1/3 cup sliced green onions
Instructions
-
Step 1
Prepare the refried bean base by mixing refried beans with 1-2 tablespoons of taco seasoning until well combined. Spread evenly across the bottom of your serving dish. -
Step 2
Create the guacamole layer by mashing avocados with lime juice, chopped cilantro, and garlic salt. Gently spread over the refried bean layer. -
Step 3
Add the diced tomatoes with green chiles (undrained) as the third layer, spreading evenly over the guacamole. -
Step 4
Dollop and gently spread the sour cream over the tomato and chile layer to create a smooth surface. -
Step 5
Sprinkle the finely shredded cheddar cheese evenly over the sour cream layer. -
Step 6
Scatter the sliced black olives over the cheddar cheese for the sixth layer. -
Step 7
Finish with the seventh layer by sprinkling diced Roma tomatoes and sliced green onions over the olives. Chill for at least 30 minutes before serving.
Important Information
Nutrition Facts (Per Serving)
It is important to consider this information as approximate and not to use it as definitive health advice.
Allergy Information
Please check ingredients for potential allergens and consult a health professional if in doubt.